How to Set Up a Reverse Proxy on Web Hosting: A Practical Guide
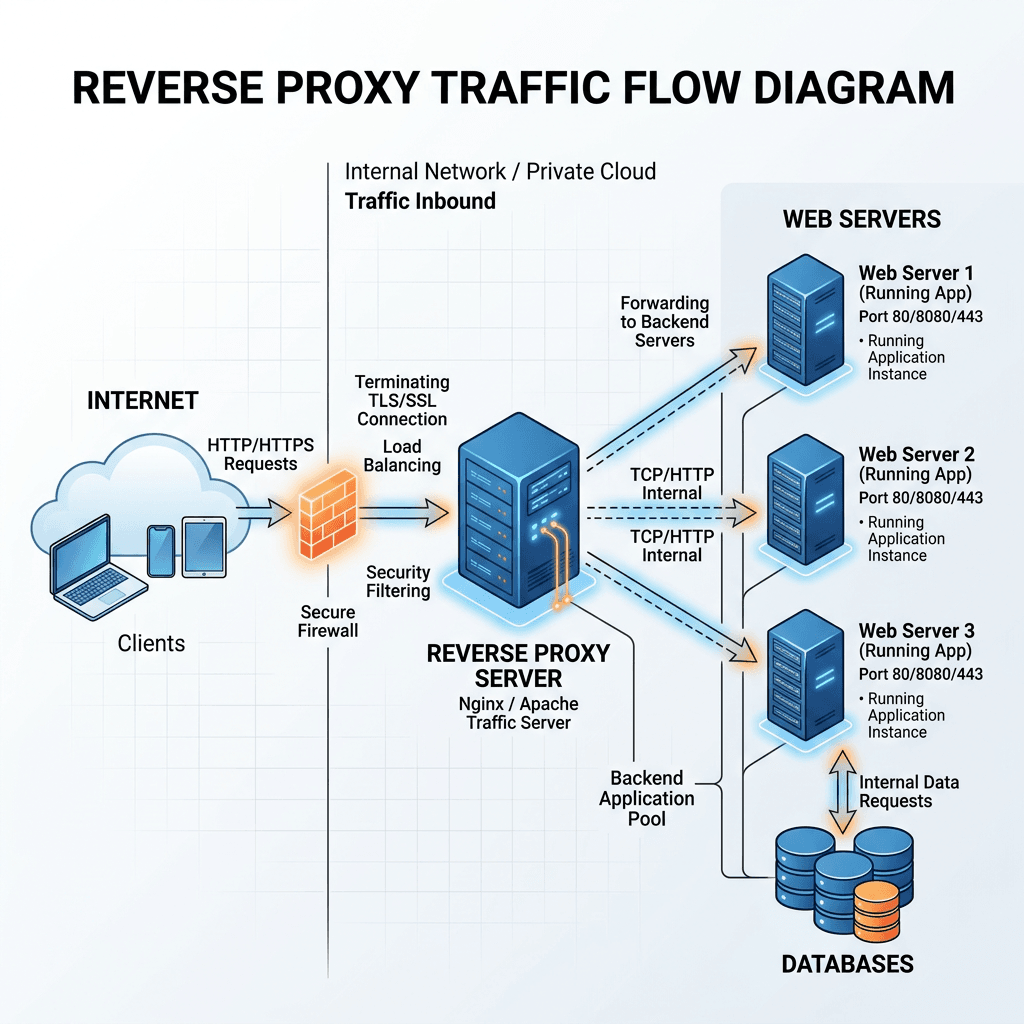
A reverse proxy sits between visitors and your website or backend application. Instead of visitors connecting directly to an application server, their requests first reach the reverse proxy, which then forwards each request to the appropriate backend service. Reverse proxies are commonly used for web applications, APIs, WordPress installations, internal applications, SSL termination, traffic routing, caching, and load balancing. However, setting up a reverse proxy requires more than adding a few configuration lines. You need the appropriate hosting environment, DNS configuration, server access, firewall rules, HTTPS, and a properly configured backend application. A configuration error can result in problems such as 502 Bad Gateway errors, redirect loops, broken sessions, missing assets, or complete website downtime.
This guide explains what a reverse proxy does, when you need one, what hosting environment is appropriate, and how to configure a basic reverse proxy using Nginx or Apache.
Important: If the website handles customer information, payments, authentication, or other business-critical traffic, test configuration changes before applying them to production. Maintain a current backup and have a rollback plan.

What Is a Reverse Proxy?
A reverse proxy is a server or service that receives requests from visitors and forwards those requests to another server or application. For example, a visitor may request:
https://www.example.com
The reverse proxy could then forward the request internally to:
http://127.0.0.1:3000
The visitor interacts with the public domain and does not need to know the internal application address or port.
Both NGINX and Apache HTTP Server support reverse-proxy configurations. NGINX’s documentation describes the proxy as receiving a request, passing it to the peroxided server, receiving the response, and returning that response to the client.
Reverse Proxy vs. Forward Proxy
A reverse proxy and a forward proxy serve different purposes. A forward proxy represents the client. The client sends requests through the proxy to external destinations. A reverse proxy represents the website or application. Visitors connect to the reverse proxy, which decides where their requests should be sent. Apache’s documentation describes a reverse proxy as appearing to the client like the ordinary web server while forwarding requests to backend servers.
What Can a Reverse Proxy Do?
Depending on the configuration, a reverse proxy can help you:
- Route requests to different backend applications
- Run applications on internal ports without exposing those ports directly
- Centralize HTTPS and SSL termination
- Place several applications behind one public domain
- Apply caching or buffering
- Add traffic-management rules
- Support load balancing
- Keep backend services behind a firewall
- Route requests based on paths or hostnames
- Provide a single entry point for multiple services
NGINX, for example, supports proxying requests to backend applications and can also distribute requests among groups of servers for load-balancing purposes. A reverse proxy is not necessary for every website. A basic website running on ordinary shared hosting may work perfectly without one.
When Should You Use a Reverse Proxy?
A reverse proxy becomes particularly useful when a website or application has more complex routing requirements.
Common use cases include:
Running a Web Application Behind a Public Domain
Applications built with technologies such as Node.js, Python, or other frameworks may run on an internal port while Nginx or Apache handles public web traffic.
For example:
Visitor
   ↓
https://example.com
   ↓
Nginx
   ↓
127.0.0.1:3000
   ↓
Application
Running Multiple Services
You may have:
example.com
serving a website while:
example.com/dashboard/
routes requests to a separate application.
The reverse proxy determines which backend should process each request.
Centralizing HTTPS
A reverse proxy can terminate
T LS/HTTPS connections before forwarding requests to backend applications.
This can simplify certificate management, although the security requirements of the connection between the proxy and backend still need to be considered.
Protecting Backend Services
A backend application can listen on a private interface or protected port while the reverse proxy handles public requests.
This can reduce the number of services directly exposed to the Internet, but it should be combined with appropriate firewall and access-control rules.
Preparing for Load Balancing
When an application eventually needs multiple backend servers, a reverse proxy can become part of a load-balancing architecture. NGINX and Apache both document reverse-proxy configurations that can sit in front of backend servers.
What Hosting Do You Need?
Before configuring a reverse proxy, check what your hosting provider actually allows.
You will typically need:
- VPS, cloud, or dedicated hosting
- SSH or administrative access
- Permission to configure Nginx, Apache, or another proxy
- DNS access
- The backend server address
- The backend application port
- SSL/T LS
- certificate access
- Firewall control
- Access to server logs
- A backup of the existing configuration
Shared hosting often does not provide the server-level access required for a custom reverse proxy. Some managed hosting providers may support reverse-proxy configurations as part of their platform, so check with the provider before assuming that you need to move to a VPS. If you need hosting that supports more advanced server requirements, see Archer IT Solutions’ web hosting services. For broader information about hosting environments, you can also read Archer’s complete guide to web hosting.
Choosing the Right Hosting Environment
Different hosting environments provide different levels of control.
| Hosting environmentReverse proxy controlTypical useShared hostingLimitedBasic websitesManaged WordPress hostingProvider-dependentManaged WordPress sitesVPSHighApplications and custom configurationsCloud hostingHighScalable applicationsDedicated serverExtensiveComplex or high-resource environments |
|---|
The right option depends on your application, technical requirements, expected traffic, security needs, and how much server administration you want to handle yourself.
If you need assistance managing servers, Archer’s Managed IT Services can be relevant for businesses that do not want to handle every infrastructure task internally.
How DNS Fits Into a Reverse Proxy Setup
DNS determines where your domain’s traffic goes.
For a basic setup, you may point the domain or relevant DNS record toward the server or proxy service handling the incoming traffic.
For example:
example.com
      ↓
DNS
      ↓
Reverse Proxy
      ↓
Backend Application
Services such as Cloudflare can also operate as reverse proxies. Cloudflare explains that when a DNS record is configured as
peroxided, HTTP/HTTPS traffic can pass through Cloudflare between the visitor and the origin server.
This means a reverse proxy does not always have to be a piece of software installed directly on your own server. A managed proxy or CDN service can provide similar functionality for certain architectures.
If you’re working with DNS as part of a hosting migration, make sure you understand which records are being changed before modifying the live domain.
Basic Reverse Proxy Setup Process
A typical server-level reverse proxy setup follows these steps:
- Point the relevant DNS record toward the proxy.
- Confirm that the backend application is running.
- Install or enable Nginx or Apache.
- Create the reverse-proxy configuration.
- Configure the appropriate request headers.
- Configure HTTPS.
- Test the proxy configuration.
- Reload the web server.
- Review the logs.
- Confirm that the backend is not unnecessarily exposed to the public Internet.
Always create a backup of the configuration before making significant changes.
Setting Up an Nginx Reverse Proxy
Nginx is widely used as a web server and reverse proxy. Its official documentation provides examples using the proxy_pass directive to forward requests to backend applications. Suppose an application is running locally on port 3000.
A basic Nginx configuration could look like this:
server {
    listen 80;
    server_name example.com www.example.com;

    location / {
        proxy_pass http://127.0.0.1:3000;
        proxy_http_version 1.1;

        proxy_set_header Host $host;
        proxy_set_header X-Real-IP $remote_addr;
        proxy_set_header X-Forwarded-For $proxy_add_x_forwarded_for;
        proxy_set_header X-Forwarded-Proto $scheme;
    }
}
The important directive here is:
proxy_pass http://127.0.0.1:3000;
It tells Nginx where to send requests.
The header directives pass information such as the original hostname, client IP information, and request protocol to the backend. NGINX’s official documentation covers proxy_pass and proxy_set_header in its reverse-proxy configuration guide.
Test the Nginx Configuration
Before reloading Nginx, test the configuration:
sudo nginx -t
If the test succeeds, reload Nginx:
sudo systemctl reload nginx
Do not reload a production server blindly after editing the configuration. If nginx -t reports an error, resolve it first.
For additional Nginx documentation, see the official NGINX Reverse Proxy documentation.
Setting Up an Apache Reverse Proxy
Apache HTTP Server can also operate as a reverse proxy using its mod_proxy functionality.
The required modules depend on your Apache configuration, but a typical setup may use:
proxy
proxy_http
headers
A basic virtual-host configuration could look like:
<VirtualHost *:80>
    ServerName example.com
    ServerAlias www.example.com

    ProxyPreserveHost On
    ProxyPass / http://127.0.0.1:3000/
    ProxyPassReverse / http://127.0.0.1:3000/

    ErrorLog ${APACHE_LOG_DIR}/example-error.log
    CustomLog ${APACHE_LOG_DIR}/example-access.log combined
</VirtualHost>
ProxyPass forwards requests to the backend, while ProxyPassReverse helps Apache handle redirect-related response headers from the backend. Apache’s official documentation specifically describes ProxyPassReverse as important for avoiding redirects that bypass the reverse proxy.
Test the configuration before reloading Apache:
sudo apachectl configtest
Then, if the configuration passes:
sudo systemctl reload apache2
For the official documentation, see the Apache Reverse Proxy Guide.
Configure HTTPS
A public website should normally use HTTPS.
In many reverse-proxy architectures, the visitor connects to the proxy over HTTPS while the proxy communicates with the backend according to the chosen architecture.
You can use a certificate from a certificate authority such as Let’s Encrypt and automate certificate management with Certbot, or use certificate-management tools provided by your hosting provider.
After configuring HTTPS:
Redirect HTTP traffic to HTTPS where appropriate.
Confirm the application understands that the original request used HTTPS.
Test login pages.
Test forms.
Test payment or checkout pages if applicable.
Check redirects.
Check cookies.
Test administrative areas.
Confirm there are no mixed-content errors.
If you’re using WordPress, verify that the site’s URL configuration is consistent with HTTPS. WordPress provides developer documentation for its site URL and HTTPS handling.
For broader website security practices, see Archer’s guide to improving website security.
Secure the Backend
A reverse proxy is not automatically secure simply because it sits in front of your application.
Review:
Firewall rules
SSH access
Server updates
Application updates
Authentication
Administrative access
Backend ports
API endpoints
Secure cookies
Proxy and application logs
Where appropriate, restrict backend ports so they are not directly accessible from the public Internet.
Also keep server configuration backups so that you can recover quickly if a configuration change causes a problem.
Archer’s website backup guide provides additional guidance on maintaining recoverable website backups.
Common Reverse Proxy Problems
Even a small configuration mistake can cause a reverse proxy to fail.
502 Bad Gateway
A 502 Bad Gateway error commonly occurs when the proxy cannot successfully communicate with the backend.
Check:
Is the application running?
Is it listening on the expected port?
Is the backend address correct?
Is a firewall blocking the connection?
Is the proxy configuration valid?
Are the application logs showing errors?
You can test a locally running backend with:
curl http://127.0.0.1:3000
If the application does not respond, investigate the backend before changing the proxy configuration.
Redirect Loops
Redirect loops can occur when HTTPS is terminated at the reverse proxy but the backend application believes the original request was HTTP.
Check the forwarded protocol information, application URL settings, and redirect rules.
For example, Nginx may pass:
proxy_set_header X-Forwarded-Proto $scheme;
The exact configuration required depends on the application and architecture.
Missing Images, CSS, or JavaScript
If the page loads but images, stylesheets, or scripts do not, investigate:
Incorrect application URLs
Path rewriting
Incorrect proxy locations
Caching rules
Mixed-content issues
Application configuration
Plugin conflicts
This is particularly important with WordPress and other CMS platforms.
Broken Login Sessions
Login problems can result from incorrect cookie settings, HTTPS configuration, host headers, or application URL settings.
If authentication works before the reverse proxy is introduced but fails afterward, compare the application’s understanding of the public URL and protocol with the information being passed by the proxy.
Reverse Proxy vs. CDN vs. Load Balancer
These technologies can work together, but they are not identical.
Reverse Proxy
A reverse proxy receives requests and forwards them to backend services.
CDN
A Content Delivery Network (CDN) distributes content through a network of locations and may also provide reverse-proxy functionality.
Cloudflare, for example, combines DNS and CDN capabilities with reverse-proxy functionality when traffic is
peroxided
through its network.
Load Balancer
A load balancer distributes requests across multiple backend servers.
For example:
                ┌── Backend Server 1
Visitor → Proxy ├── Backend Server 2
                └── Backend Server 3
This architecture can help with scalability and availability when an application is designed to operate across multiple backend servers.
NGINX and Apache both document reverse-proxy configurations that can be used in architectures involving multiple backend servers.
For a small business website, a managed CDN/reverse-proxy service may be simpler than maintaining a custom server-level configuration. For applications requiring custom routing or server-level control, Nginx or Apache may be more appropriate.
Practical Example: WordPress and a Node.js Application
Suppose a business has:
example.com
running its WordPress website.
It also has a customer dashboard running on Node.js at:
127.0.0.1:3000
The reverse proxy could route:
example.com/
to WordPress and:
example.com/dashboard/
to the Node.js application.
The visitor still sees one domain:
https://example.com
while the server determines which backend should process each request.
This type of architecture can be useful when a business needs to combine a CMS with a separate web application.
Reverse Proxy Security Checklist
Before putting a reverse proxy into production, check the following:
DNS points to the correct destination
SSL/
T LS
certificate is valid
HTTP-to-HTTPS redirects work correctly
Backend application is running
Backend port is appropriately protected
Firewall rules have been reviewed
Proxy headers are configured correctly
Website forms work
Login functionality works
Images, CSS, and JavaScript load correctly
Application URLs are correct
Proxy logs are being reviewed
Application logs are being reviewed
Configuration files have been backed up
A rollback procedure is available
Changes have been tested before production deployment
For important business websites, testing should be done before exposing the new configuration to all visitors.
Frequently Asked Questions
What do I need to set up a reverse proxy?
You will generally need a hosting environment that permits server-level configuration, DNS access, a backend application or server, proxy software such as Nginx or Apache, HTTPS configuration, and appropriate firewall access.
Can I set up a reverse proxy on shared hosting?
Usually, custom server-level reverse-proxy configurations are limited on shared hosting. Ask your hosting provider whether reverse proxy functionality is supported before attempting the setup.
Does a reverse proxy make a website faster?
It can contribute to performance through caching, buffering, connection management, or routing, but a reverse proxy does not automatically make every website faster. Performance depends on the proxy configuration, hosting resources, backend application, caching strategy, and website itself.
Why am I getting a 502 error?
A 502 error commonly indicates that the reverse proxy cannot successfully communicate with the backend. Check that the application is running, the correct port is being used, the backend address is correct, and firewall rules are not blocking the connection.
Should I use Nginx or Apache?
Both can function as reverse proxies. The appropriate choice depends on your existing server environment, application requirements, technical expertise, and configuration preferences.
Is a reverse proxy secure?
A reverse proxy can contribute to a more controlled architecture, but it is not a substitute for security. Firewalls, HTTPS, authentication, software updates, access controls, backups, monitoring, and secure application configuration are still required.
Final Takeaway
A reverse proxy can provide a useful layer between visitors and backend applications. It can route traffic, centralize HTTPS, support multiple applications, provide caching or load-balancing capabilities, and help keep backend services from being directly exposed.
However, the quality of the result depends heavily on the configuration.
Before implementing one, make sure your hosting environment provides the necessary access, your DNS is configured correctly, your backend is working, HTTPS is properly implemented, and your firewall rules protect the underlying services.
For businesses running WordPress websites, web applications, or other business-critical systems, server configuration should be approached carefully and tested before production deployment.
If you need help with web hosting, server administration, website security, or managed IT support, visit Archer IT Solutions or contact Archer IT Solutions to discuss your requirements.
FAST, SECURE WEB HOSTING FOR YOU
Reliable Hosting for Your Business
Fast, secure and reliable hosting solutions designed to keep your website online, protected and ready to grow.
Standard Hosting
Fast, reliable hosting with the essential tools your business website needs.
- Fast, reliable hosting
- Free SSL security
- Professional email accounts
- 1-click WordPress setup
- Scalable for growing traffic
Domain Only
Register your domain with simple setup and flexible hosting options.
- Affordable yearly pricing
- Easy setup
- Works with any hosting
- Simple domain management
Reseller Hosting
Start your own hosting business or manage multiple client websites with flexible reseller hosting plans.
Reseller 1
- 10 Domains
- 100 GB Disk Space
- 2TB Bandwidth
- 100 Databases
- 100 Mailboxes
- WordPress Ready
Reseller 2
- 25 Domains
- 300 GB Disk Space
- 6TB Traffic
- 300 Databases
- 300 Mailboxes
- WordPress Ready
Reseller 3
- 50 Domains
- 600 GB Disk Space
- 12TB Traffic
- 600 Databases
- 600 Mailboxes
- WordPress Ready
Reliable web hosting with SSL, professional email, backups, and responsive technical support. Get the performance and support you need to keep your business website online and running smoothly.
Launching a new website or moving from another provider? Archer IT Solutions makes hosting simple, secure, and easy to manage.
WHY CHOOSE ARCHER IT?
Everything You Need to Keep Your Website Running Smoothly
⚡ 99.9% Uptime Guarantee
Keep your website available and accessible with reliable hosting infrastructure.
🔒 Free SSL Certificates
Protect your website and visitors with SSL security included with your hosting.
📧 Professional Business Email
Create professional email addresses using your own business domain.
⚙️ One-Click WordPress Installation
Get your WordPress website up and running quickly with easy installation.
💾 Automatic Daily Backups
Help protect your website data with regular automated backups.
🚀 Fast SSD Storage
Fast storage helps your website load efficiently and provides a smoother experience for visitors.
🛠️ 24/7 Technical Support
Get technical assistance when you need help with your hosting.
🔄 Website Migration Assistance
Move your existing website to Archer IT with assistance from the support team.
HOSTING THAT GROWS WITH YOUR BUSINESS
Whether you’re launching your first website or managing multiple client websites, Archer IT Solutions provides reliable hosting designed to support your business as it grows.
Our hosting solutions provide:
⚡ Fast Performance
🔒 Reliable Security
✓ Dependable Uptime
⚙️ Easy Website Management
🛠️ Local Expert Support
WHY BUSINESSES CHOOSE ARCHER IT HOSTING
Enterprise Security
Protect your website with free SSL certificates, malware protection, and secure hosting infrastructure.
Fast Performance
Optimized SSD storage helps your website load quickly and provides a smoother experience for visitors.
Expert IT Support
Get friendly, knowledgeable assistance when you need help with your hosting or website.
Automatic Daily Backups
Regular backups help protect your website data and make recovery easier when needed.
Professional Business Email
Create professional email addresses using your business domain to build trust with customers.
One-Click WordPress Installation
Get your WordPress website up and running quickly with easy installation.
15-DAY MONEY-BACK GUARANTEE
Try Archer IT Hosting Risk-Free
We’re confident in the reliability of our hosting services. If you’re not completely satisfied within your first 15 days, you can request a full refund.
No hidden fees.
No complicated process.
REAL PEOPLE. REAL SUPPORT.
When you need help, you can reach experienced IT professionals who understand your website and hosting needs.
Our team can assist with website migration, email setup, WordPress support, website troubleshooting, and hosting management.
Our team can help with
- Website migration
- Email setup
- WordPress support
- Website troubleshooting
- Hosting management
FREQUENTLY ASKED QUESTIONS
Find answers to common questions about Archer IT hosting, website migration, WordPress, security, and technical support.
What is web hosting?
Web hosting is a service that stores your website files and makes your website accessible on the internet.
Can you migrate my existing website?
Yes. Archer IT Solutions can help migrate your existing website to Archer hosting with minimal downtime.
Is SSL included?
Yes. Every hosting package includes a free SSL certificate to help protect your website and visitors.
Can I install WordPress?
Yes. Our hosting plans include one-click WordPress installation for quick and easy setup.
What happens if my website grows?
You can upgrade your hosting plan as your business and website requirements grow.
Do you provide IT support?
Yes. In addition to web hosting, Archer IT Solutions provides professional IT support to help keep your systems and technology running smoothly.
READY TO GET YOUR WEBSITE ONLINE?
Give your business a reliable foundation with professional web hosting and responsive IT support from Archer IT Solutions. Let us help you get online with confidence.


No responses yet